Securing 802.11 with OpenBSD
Jarkko Turkulainen
How can we make sure that our WLAN traffic is useless for all unauthorized listeners? From the OSI layer 3 point of view, 802.11 is not different than any other LAN technique (ethernet, token ring..). This makes it possible to use standard solutions for securing IP traffic.
This document describes an implementation of 802.11 wireless LAN access point and VPN gateway using the OpenBSD operating system and how to secure the WLAN traffic with IPsec. We are going to utilize many of the hot Internet buzzwords, including
Using an external, "real" BSS-mode access point is also perfectly possible. The access points are wired to same physical network as the OpenBSD box via hub/switch. Of course, you need two ethernet interfaces in this setup. If your network is large and spans over multiple rooms/buildings, this is the only way to go.
Update: It is possible to build a BSS-mode access point using a so called "Host AP mode" in Intersil Prism2 chips. Check out my cool (and not only thermally) OpenBSD 802.11b access point project.

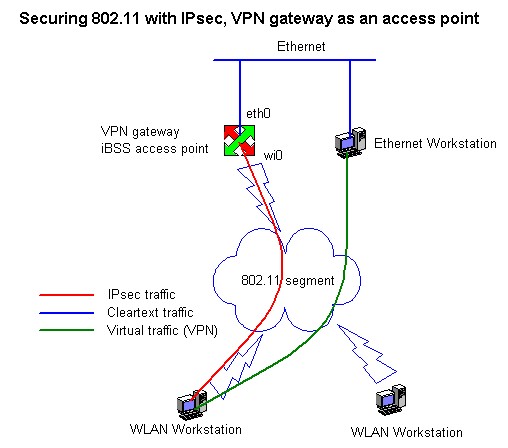
The most important thing to remember with either of these configurations is routing. 802.11 network has to found behind the VPN gateway interface eth0. Most of the time, this involves installing a static route. It should be noted that even if you are using HW access points, the VPN gateway acts as a router to 802.11 network - not bridge!
The wireless interface is easy to setup. Plug in the interface card and write the configuration in /etc/hostname.in where "in" is the name of the interface. Please read the file INSTALL.i386 for supported interface cards. In my case, the card is Lucent Orinoco silver PCMCIA card plugged in PCMCIA->ISA bridge board (Vadem VG469). My /etc/hostname.wi0 is
inet 10.10.10.10 255.255.255.0 !wicontrol \$if -e 0 -p 1 -t 3 -c 1 -n klake -q klake -s openbsd |
Change the IP (10.10.10.10), mask (255.255.255.0), channel (3), network names (klake) and station name (openbsd). You may also have to change the device name (wi0), check out your dmesg(8). Note that the WEP encryption is set off (e = 0) - we are speaking only IPsec here.
shared-network LOCAL-NET {
        option  domain-name "www.klake.org";
        option  domain-name-servers 10.10.9.53;

        subnet 10.10.10.0 netmask 255.255.255.0 {
                option routers 10.10.10.10;

                range 10.10.10.129 10.10.10.254;
        }
}
|
Again, change the names, IP addresses and netmasks. Next, edit the file /etc/rc.conf and change the line
dhcpd_flags="-q wi0" # for normal use: "-q" |
The flag "-q" makes dhcpd silent and wi0 is the interface on the wireless side. Fire up the daemon with command
# /usr/sbin/dhcpd -q wi0 |
Setting up a public key infrastructure (PKI) using OpenSSL is documented in the isakmpd(8) manual page. You can also check out my project Simple CA for OpenBSD based VPN and skip chapters 3.3 - 3.5.
Create CA key and certificate request
# openssl genrsa -out /etc/ssl/private/ca.key 2048 # openssl req -new -key /etc/ssl/private/ca.key \ -out /etc/ssl/private/ca.csr |
Now it's time to enter your DN (Distinguished Name) and sign the certificate request with the command
# openssl x509 -req -days 730 -in /etc/ssl/private/ca.csr \ -signkey /etc/ssl/private/ca.key \ -extfile /etc/ssl/x509v3.cnf -extensions x509v3_CA \ -out /etc/ssl/ca.crt # ln -s /etc/ssl/ca.crt /etc/isakmpd/ca/ca.crt |
You can now look at the details of the CA certificate
$ openssl x509 -in ca.crt -text -noout

        Issuer: C=FI, O=www.klake.org, CN=www.klake.org VPN CA
        Validity
            Not Before: Jan 12 16:41:50 2002 GMT
            Not After : Jan 12 16:41:50 2004 GMT
        Subject: C=FI, O=www.klake.org, CN=www.klake.org VPN CA
|
# openssl genrsa -out /etc/isakmpd/private/local.key 1024 # openssl req -new -key /etc/isakmpd/private/local.key \ -out /etc/isakmpd/private/server.csr |
Enter the FQDN as server CN (Common name) and proceed with the signing of the certificate
# openssl x509 -req -days 365 -in /etc/isakmpd/private/server.csr \ -CA /etc/ssl/ca.crt \ -CAkey /etc/ssl/private/ca.key -CAcreateserial \ -out /etc/isakmpd/certs/local.crt |
subjectAltName extension is added to certificates using a certpatch(8) utility.
# certpatch -k /etc/ssl/private/ca.key -t FQDN -i vpngw.klake.org \ /etc/isakmpd/certs/local.crt /etc/isakmpd/certs/local.crt |
# certpatch -k /etc/ssl/private/ca.key -t UFQDN -i noone@nowhere.com \ client.crt client.crt |
Next, we export the key and certificates
# openssl pkcs12 -export -certfile /etc/ssl/ca.crt \ -inkey client.key -in client.crt -out client.p12 |
# Global options [General] Retransmits= 5 Exchange-max-time= 120 Check-interval= 60 # X.509 certificate locations [X509-certificates] CA-directory= /etc/isakmpd/ca/ Cert-directory= /etc/isakmpd/certs/ Private-key= /etc/isakmpd/private/local.key # IKE Phase 1 & 2 [Phase 1] Default= Client-phase1 [Phase 2] Passive-Connections= Client-phase2 # Clients, phase 1 and 2 [Client-phase1] Phase= 1 Transport= udp Local-address= 10.10.10.10 Configuration= Client-main-mode ID= My-ID [My-ID] ID-type= FQDN Name= vpngw.klake.org [Client-phase2] Phase= 2 Configuration= Client-quick-mode Local-ID= All-networks Remote-ID= Unknown-address # Network details [All-networks] ID-Type= IPV4_ADDR_SUBNET Network= 0.0.0.0 Netmask= 0.0.0.0 [Unknown-address] ID-Type= IPV4_ADDR Address= 0.0.0.0 # Main -and quick mode transforms [Client-main-mode] DOI= IPSEC EXCHANGE_TYPE= ID_PROT Transforms= 3DES-MD5-Client [Client-quick-mode] DOI= IPSEC EXCHANGE_TYPE= QUICK_MODE Suites= QM-ESP-3DES-MD5-SUITE # Encryption/Authentication suite definitions [3DES-MD5-Client] ENCRYPTION_ALGORITHM= 3DES_CBC HASH_ALGORITHM= MD5 AUTHENTICATION_METHOD= RSA_SIG GROUP_DESCRIPTION= MODP_1536 Life= LIFE_9000_SECS [QM-ESP-3DES-MD5-SUITE] Protocols= QM-ESP-3DES-MD5 [QM-ESP-3DES-MD5] PROTOCOL_ID= IPSEC_ESP Transforms= QM-ESP-3DES-MD5-XF [QM-ESP-3DES-MD5-XF] TRANSFORM_ID= 3DES ENCAPSULATION_MODE= TUNNEL AUTHENTICATION_ALGORITHM= HMAC_MD5 GROUP_DESCRIPTION= MODP_1024 Life= LIFE_3600_SECS # Lifetime definitions [LIFE_3600_SECS] LIFE_TYPE= SECONDS LIFE_DURATION= 3600,1800:7200 [LIFE_9000_SECS] LIFE_TYPE= SECONDS LIFE_DURATION= 9000,4500:18000 |
Isakmpd also needs a second file to be present, /etc/isakmpd/isakmpd.policy. My policy file allows anyone with a non-null ESP algorithm to connect:
KeyNote-Version: 2
Authorizer: "POLICY"
Conditions: app_domain == "IPsec policy" &&
                esp_present == "yes" &&
                esp_enc_alg != "null" -> "true";
|
Edit the file /etc/rc.conf
isakmpd_flags="" # for normal use: "" |
Start up the daemon with command
# /sbin/isakmpd |
The following example /etc/pf.conf tries to clarify this.
########################################################################
# WLAN (wi0) traffic
########################################################################

# SSH for remote administation
pass in quick on wi0 proto tcp from 10.10.10.128/25 to 10.10.10.10/32 \
	port = 22 keep state

# dhcp requests and responses
pass in quick on wi0 proto {tcp,udp} from any port = 68 to 10.10.10.10/32 \
	port = 67
pass out quick on wi0 proto {tcp,udp} from 10.10.10.10/32 port = 67 to \
	10.10.10.128/25 port = 68
pass out quick on wi0 proto icmp from 10.10.10.10/32 to 10.10.10.128/25 \
	icmp-type 8 keep state

# ESP and IKE
pass out quick on wi0 proto esp from 10.10.10.10/32 to 10.10.10.128/25
pass in quick on wi0 proto esp from 10.10.10.128/25 to 10.10.10.10/32
pass out quick on wi0 proto udp from 10.10.10.10/32 to 10.10.10.128/25 \
	port = 500
pass in quick on wi0 proto udp from 10.10.10.128/25 to 10.10.10.10/32 \
	port = 500

# default deny
block out log quick on wi0 all
block in log quick on wi0 all
|
10.10.10.128/25 is the address pool of the DHCP server (see section 3.2) and 10.10.10.10/32 is the wireless interface. If you are using HW access points, replace the interface wi0 with your ethernet interface (eth1 in the picture 2.2). The default action for pf is pass so the above example file should work out of the box. Of course, you should configure filters on all the other interfaces (ethernet(s), loopback, enc) as well.
The rules can be tightened further by using authpf(8). In that case, we allow only the ssh connection and dhcp. IPsec related rules are created dynamically if the user authentication is successful. See the chapter Improving security.
Activate the IP forwarding and start filtering
# sysctl -w net.inet.ip.forwarding=1 # pfctl -e |
Start the Certificate Manager and Import your client certificate

Import the CA certificate

Next, start the Policy Editor and type in a new connection. Note that the Gateway ID Type is "Domain Name" (FQDN), this is the "My-ID" section in our example isakmpd.conf.

Configure Proposal for IKE Phase 1. Type in the Authentication Method, Algorithms and Key group (Group 5 = MODP_1536).

Configure Proposal for IKE Phase 2. Nothing exciting here.
Import certificates and private key
$ openssl pkcs12 -in client.p12 -out client.certs |
Cut and paste the CA certificate in file client.certs as /etc/ipsec.d/cacerts/ca.crt. Cut and paste your client certificate (also in the file client.certs) as a new file. Convert this new file into binary DER format
$ openssl x509 -in newfile -outform DER -out /etc/x509cert.der |
Next, strip the private key with fswcert utility
$ fswcert -k --type pkcs12 client.p12 |
Insert the fswcert output in the file /etc/ipsec.secrets. The key is bound to the UFQDN of the client
noone@nowhere.com : RSA {
	Modulus:
	PublicExponent:
	PrivateExponent:
	Prime1:
	Prime2:
	Exponent1:
	Exponent2:
	Coefficient:
}
|
Next, edit the file /etc/ipsec.conf. Below is an example of connection section.
conn klake
        keyexchange=ike
        auth=esp
        keyingtries=5
        type=tunnel
        pfs=yes
        authby=rsasig
        ikelifetime=2.5h
        keylife=1h
        rekey=yes
        auto=start
        # gateway-side connection
        left=10.10.10.10
        leftrsasigkey=%cert
        leftid=@vpngw.klake.org
        leftnexthop=
        leftsubnet=0/0
        # client-side connection
        right=%defaultroute
        rightrsasigkey=%cert
        rightid=noone@nowhere.com
        rightnexthop=
        rightsubnet=
|
That should be all that is needed. Run /etc/rc.d/init.d/ipsec start.
Some notes
Thanks for Kevin Cheng
By following the example networks of this document, all the necessary WLAN rules can be shrinked down to a following rule set that allows only SSH and DHCP:
########################################################################
# WLAN rules in /etc/pf.conf
########################################################################

# SSH for user authentication
pass in quick on wi0 proto tcp from 10.10.10.128/25 to 10.10.10.10/32 \
	port = 22 keep state

# dhcp requests and responses
pass in quick on wi0 proto {tcp,udp} from any port = 68 to 10.10.10.10/32 \
	port = 67
pass out quick on wi0 proto {tcp,udp} from 10.10.10.10/32 port = 67 to \
	10.10.10.128/25 port = 68
pass out quick on wi0 proto icmp from 10.10.10.10/32 to 10.10.10.128/25 \
	icmp-type 8 keep state

# default deny
block out log quick on wi0 all
block in log quick on wi0 all
|
The following rules are enough to allow VPN connections from the IP address that initiates the authentication process:
######################################################################## # /etc/authpf/authpf.rules ######################################################################## # ESP and IKE pass out quick on wi0 proto esp from 10.10.10.10/32 to $user_ip pass in quick on wi0 proto esp from $user_ip to 10.10.10.10/32 pass out quick on wi0 proto udp from 10.10.10.10/32 to $user_ip port = 500 pass in quick on wi0 proto udp from $user_ip to 10.10.10.10/32 port = 500 |
Please read carefully the manual page for authpf(8), it includes all the information that is needed to setup user accounts and authpf configuration files.
You also need to install a SSH client software in your workstation. Any SSH2 compatible package will do the trick (ssh.com, OpenSSH, PuTTY). You can also try this precompiled OpenSSH-3.5p1 if you are not willing to pay a big $$ for ssh.com or playing with cygwin. The package include some scripts that will make the setup easier. Just unzip the file to directory C:\authpf and run the shortcut "User Authentication".
THE AUTHOR IS NOT RESPONSIBLE OF ANY DAMAGES INCURRED DUE TO ACTIONS TAKEN BASED ON THE INFORMATION IN THIS DOCUMENT.
.
